I’m less than 3 weeks away from Penguin Day (November 16th), and I just completed my first test pack. I’m in big trouble. I’ve got too much stuff. Way too much for the suitcase I’ve used on every other trip so far. How come you might ask. Well, it’s complicated. First of all, I’ll be gone for almost 2 full weeks, so you need all the basics like underwear, shirts and socks (I plan on using the laundry service which helps a bit)
And then there’s that weather thing. I’ll start out flying from Sacramento, to Los Angeles, and then on to Santiago where temperatures are similar to where I’m starting – high in the low 80’s. The next day, we fly to Ushuaia, Argentina where we spend the day cruising around the fjords before boarding the Resolution to head off to Antarctica. The weather in that port city can vary between 80 and 50 this time of year, and it will probably be nippy cruising around. I’ll probably want to wear a few layers, and heavier pants since we will be spending time out in the open, photographing the scenery and wildlife.
Then we board the ship and spend the next two days at sea navigating the infamous Darwin passage. It will be nice and cozy warm on board. There’s no dress code on National Geographic cruises, but I really don’t want to dress like a complete slob. Jan would be very unhappy if I go back to my old wardrobe habits (jeans, t-shirts, sweat shirts). And there will be times (many I hope) when we will be out in the viewing areas when there are photo opportunities of ocean beasties. Time to don windproof/waterproof layers.
Once we get to Antarctica, the fun begins. This is spring time in the land of ice and penguins, with temperatures averaging in the low 20’s (F). That’s really cold, but not that different from skiing in the Rockies. Activities will include kayaking on open inflatable kayaks, cruising in open Zodiac boats to view wildlife and scenery, and on shore “hiking” (snow shoes or cross-country skiing) to commune with the wildlife. Here’s where the packing challenges begin. This is sort of like packing for a ski vacation in, say, Canada, where you are flying to your destination, thus limiting what you can bring along. NatGeo provides the outer layer – a waterproof, hooded shell with a heavy fleece jacket. So you do not need to include that on the way there, but you get to take it home (if you want). Those will take up a lot of luggage space. Or I could just wear them on the plane. That could happen. Good thing I’m flying 1st class and will not have to battle for overhead luggage space.
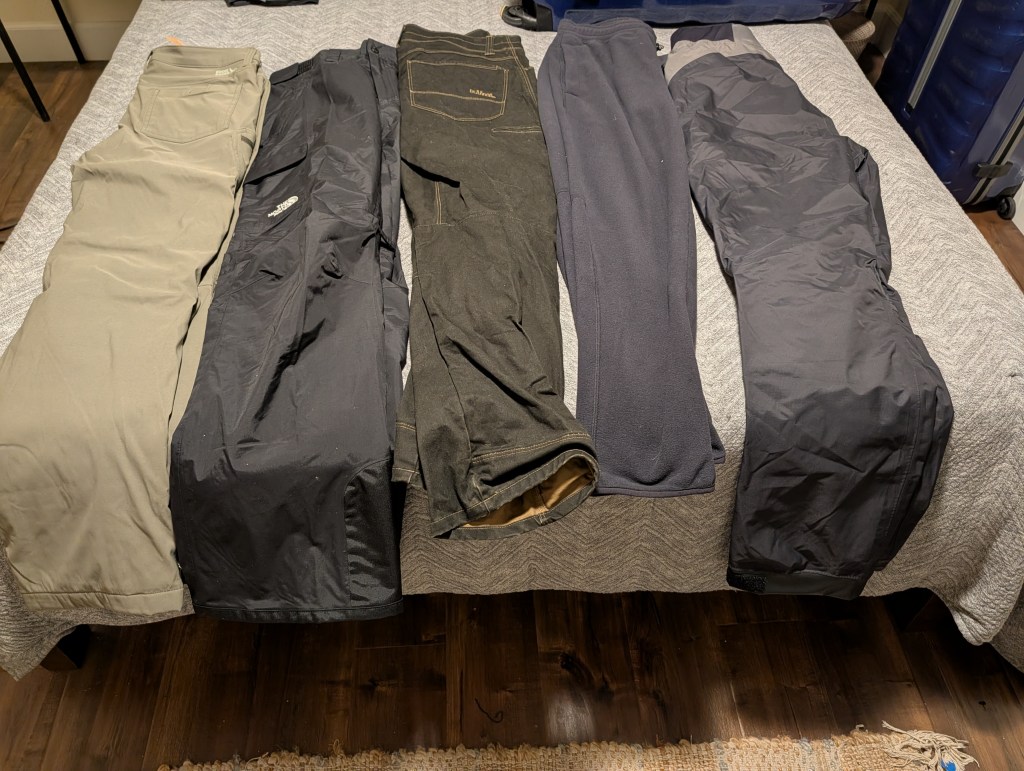
All the additional, required winter layers take up a lot of room in luggage. Insulated, waterproof pants are a must for most every activity. Those theoretically could be used for kayaking, but ski pants were not really designed for being immersed in water (which hopefully will not happen), so waterproof kayak pants are a better choice for that activity. And it would be nice to have something else to wear on board for evening gatherings. So that makes a minimum of three pairs of pants, other than what you wear for travel. I went a bit crazy shopping for this trip (hard to believe…it’s become a new hobby for me) – I bought North Face insulated pants, and a pair of fleece pants at the Colorado REI, and already had the kayak bottoms, and a pair of winter weight hiking pants that Jan bought me years ago. So that makes four for packing, although the fleece pants are also a thermal layer. And then I found a really nice pair of fleece lined pants, on sale, the other day. That would be overkill. Darn. I’ll save those for my January trip to Yosemite.
Thermal layers are thin, but still take up a lot of room in luggage unless you are a small size, which I’m not (tall, not wide!). You need more than one pair of each unless you want to do sink laundry, which is difficult in a small cabin, with a tiny bathroom. A couple of fleece sweaters for wearing on board take up a bit more space. And you need heavy, waterproof gloves, a hat, scarf/buff, and heavy boot socks – no flip flops on this trip. And, it would be nice to have another pair of lightweight, comfortable shoes for wandering around on the ship..sneakers would be a good choice since there is a nice gym on board.
And you still need room for all the odds and ends everyone carries on trips (meds, toiletries), and I’ll probably have some overflow from the camera bag. That’s almost worth another post, but I’ll spare you from another boring description of camera gear. Oh yeah, I also need to stuff a small pack in there somehow.
This is why I always start packing a few weeks before the flight – I have plenty of time to reconsider what I really need for the trip, and can pare down to basics if need be. I do have one larger suitcase, and my next test will be to repack into that one, before I start eliminating items (except for the comfy lined pants….already out). We bought this particular piece of luggage for our one and only cruise so I know it will fit under the bed in my cabin. As long as the weight is under 50lbs, I’m good to go.
My trips to warmer locals have been a lot easier to pack for, even with cramming snorkel gear into the suitcase. No gloves, heavy sweaters or thermal layers – just shorts, some shirts and a pair of beach shoes. The Alaska trip was relatively easy as well – just rain gear and the kayak stuff. I did bring my down sweater along, but never wore it. With the exception of the Churchill (Northern Lights) trip in 2027, all of my future adventures will be to relatively warm climates, so packing will be easier. Iceland will be in mid-summer – it may be wet, but not freezing cold. Patagonia will be a lot like the Alaska trip – possibly wet, but not freezing. Both the Baja Jones and the Run-from-the-bears Kodiak trips will be easy to pack for since there are limitations on luggage size and weight in the small single engine planes. I’ll be packing a duffel bag for clothing.
Since travel has become the focus of my life (Bromberg 2.0), I’m going to have a lot of opportunities to improve on my packing skills. My house will likely continue to develop into an REI outlet store as I find more specialized toys and clothing for the specialized requirements for each adventure. I’ve already got my eyes on a line of hard duffel bags for the Kodiak trip. I’m waiting for someone to invent spray on clothing. It could happen.