Tag: adventure

  • Escape to (and from) Alcatraz

    My big day did not start too well – I tweaked my back somehow walking around, and it hurt pretty bad in the morning. A couple of Ibprofin helped, and I Uber’d over to the Alcatraz Ferry stop (Pier 33) rather than walking again. Good move. And, it was a crummy morning – cold, damp and a bit foggy. It’s summer in the bay, so this is pretty much the norm. The company managing the ferry does a really great job of handling the crowds (it was crowded), managing the groups getting on and off the ferry boats. I was there early, but they let me board a half hour before my allotted time. They have three or four different boats, all with multiple decks and snack bars. The ride was short – maybe 15 minutes.  Once you get to the island, a park ranger gives a welcome spiel, and then you are  pretty much on your own, and that worked fine for me. There is just sooo much to see. You do get a map ($1, optional), and it’s kind of hard to get lost on an island.

    Waiting for a ferry
    Boarding the ferry – lots of people, but well organized.
    Cold, crummy day so far
    Looking back to city…typical summer day

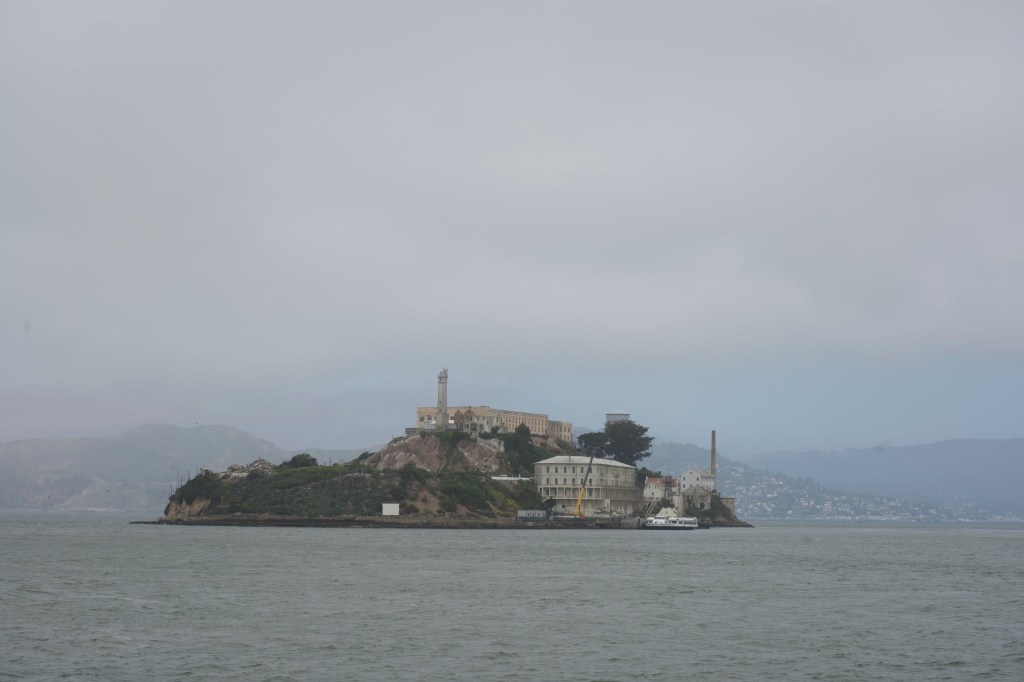
    The next image, as you get close to the island, is a great view of what to expect when you get there. The very top of the hill (The Rock) is the cell block, which includes the lighthouse and warden’s house at one end. So much to wander through. It’s a steep path to the top (and an even steeper stair case on one side). The boat docks by the big building on the shore – an old fort/barracks, and the main entrance. At the other end, below the water tank, is the power plant and beyond that are even more buildings. There are paths circling the entire island as well. Plan to spend some time there, and wear good walking shoes!

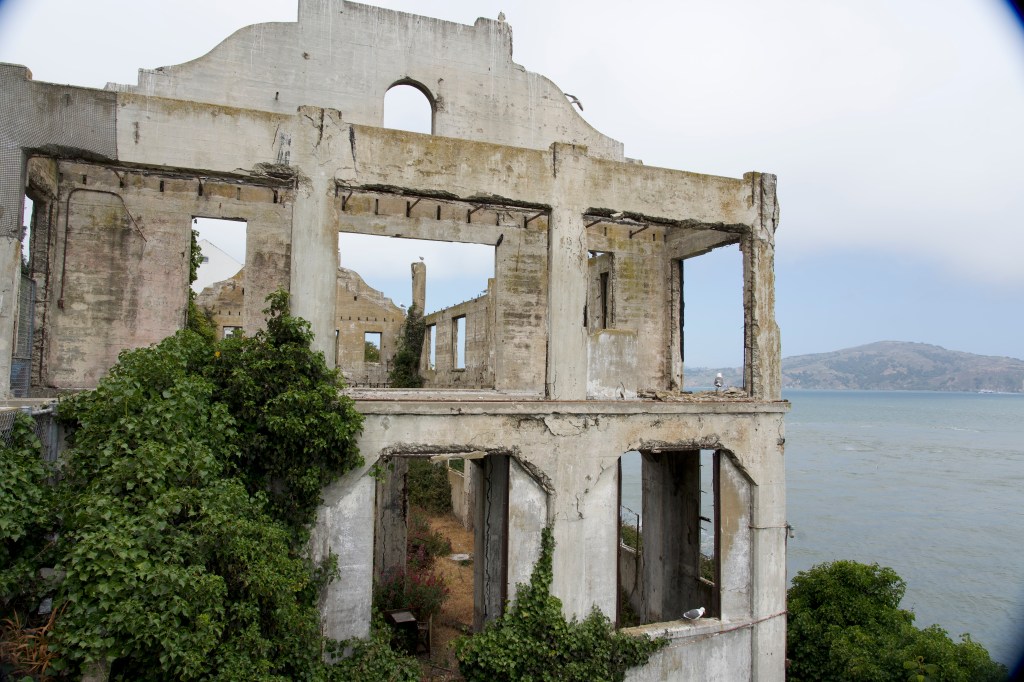
    I had spent a little bit of time checking out the National Park web site for Alcatraz, and knew a little bit about it’s history, but it is still amazing when you set foot on the island, and see all the old buildings, many just ruins. The first building you see when you get off the boat was an old fort turned into barracks (the big white building in the photo above), from the 1860’s. Across from that are the ruins of the officers club, now a hangout for Sea Gulls….which are all over the island. More on that in a bit.

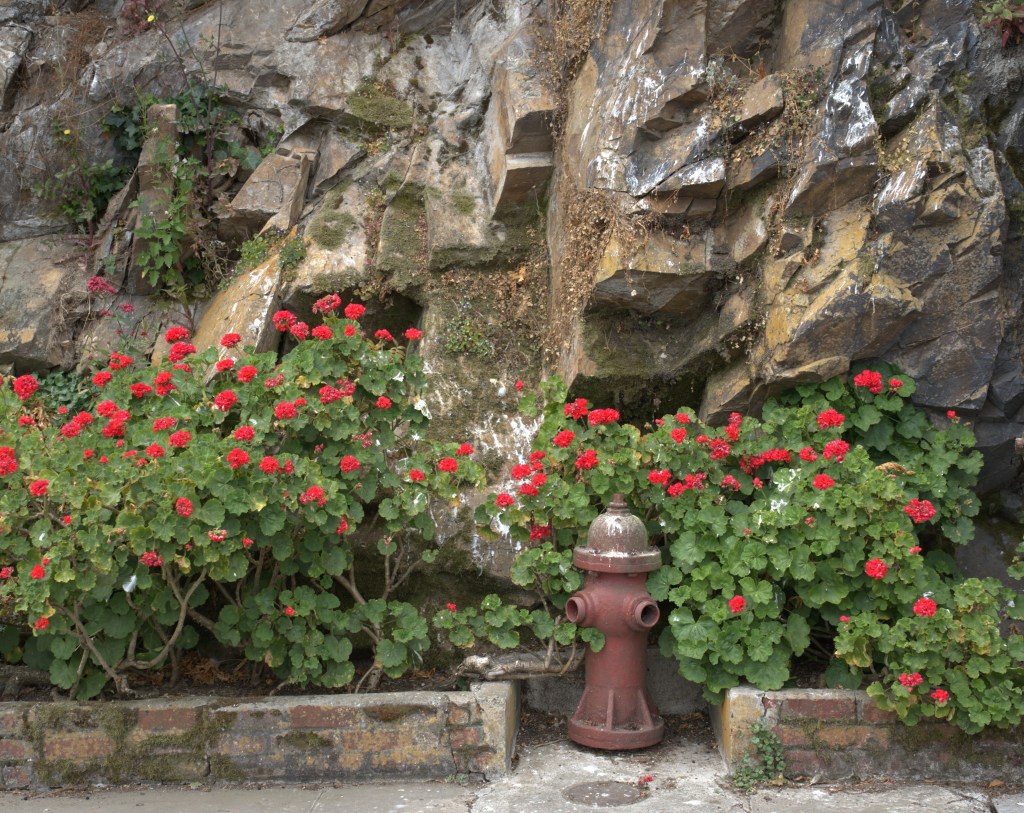
    I was planning to be on the island until there was nothing left to see, so I was in no particular rush to get to the main attraction, the cell block. So after spending some time photographing the ruins of the officers club and checking out an old cannon (a strange obsession of mine), I opted to first visit the Alcatraz gardens since they close off early. What a surprise – the gardens go back a long time, first started by the army – not a huge area, but some really beautiful flowers. Seems so out of place there, but there are gardens all along the island perimeter. 

    Flowers everywhere….it’s a nice climate for growing things that like cool, damp weather.

    And one more…

    After that, I worked my way up the hill (very steep, but they do have a shuttle from the dock to the top), aiming for the audio tour of the huge cell block. Lots of signs pointing the way with gulls to provide encouragement.

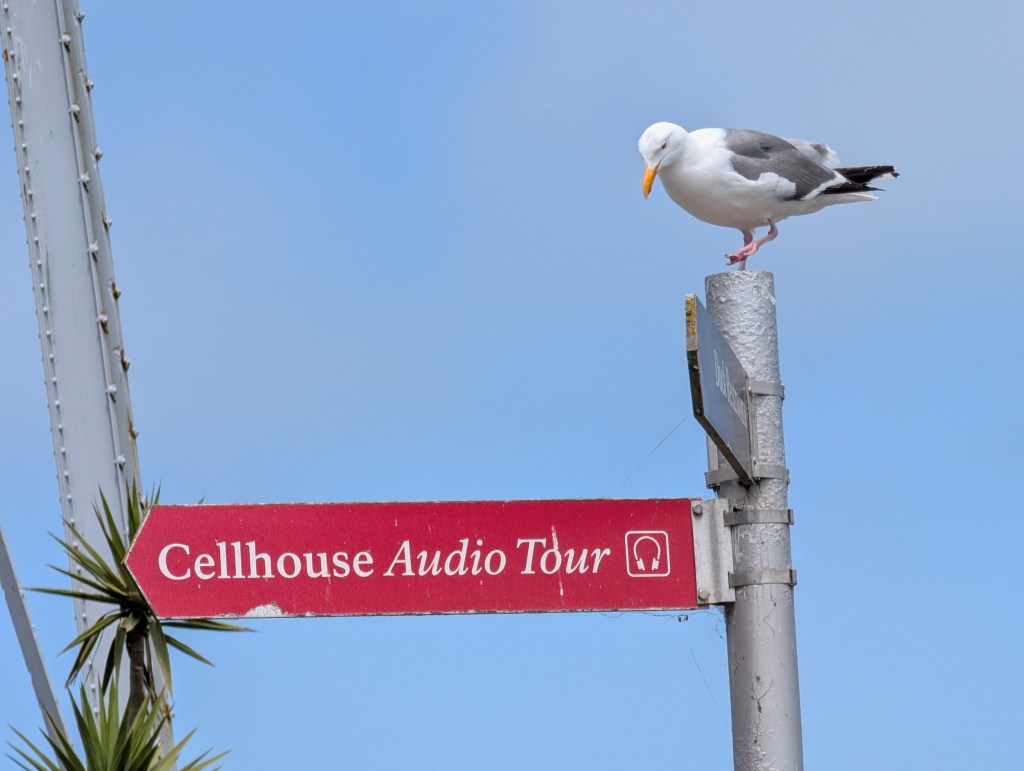
    A side note here…..the island is a nesting site for a number of birds, mostly gulls and comorents so there are a lot of interesting bird shots in this post. Like this one.

    If you’ve never been to Alcatraz, it is an amazing place, worth adding to your list of parks to visit. The free audio tour is excellent – you get headphones and a small recorder, and it leads you through the tour, with directions, descriptions of what you are seeing, and recordings from former prison guards and prisoners. You sort of forget all the othe people wandering around, and just focus on the narrative. This tour covers most of what you would want to see in the main building – the cell blocks, dining hall, solitary confinement, library, the cells where some of the notorious criminals slept, and where the major escape attempts occurred. All described in detail on the audio. Once you are finished (and might need a break), you turn in the equipment, and you are on your own to wander the island (ending up in the gift shop of course). And there is so much more to see. And yes, there are bathrooms that are not in a cell.

    Typical cell – en suite bathroom
    Fully furnished cell – they even had a built-in radio outlet (just two stations
    One of the main blocks (Broadway I think). They all look the same

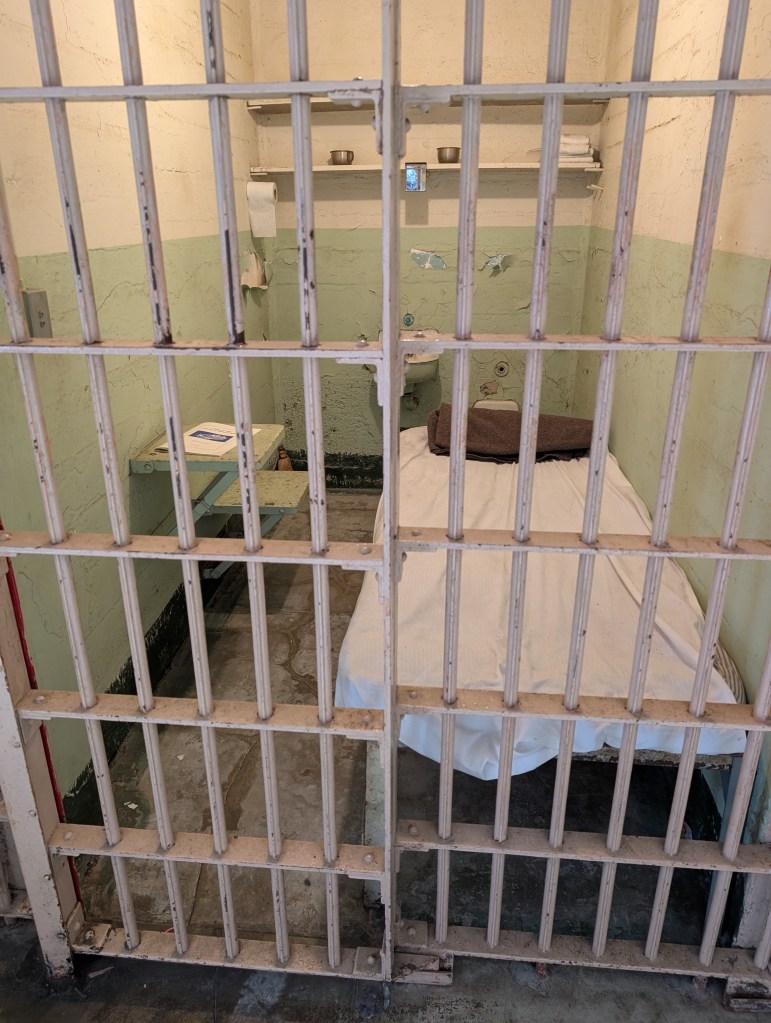
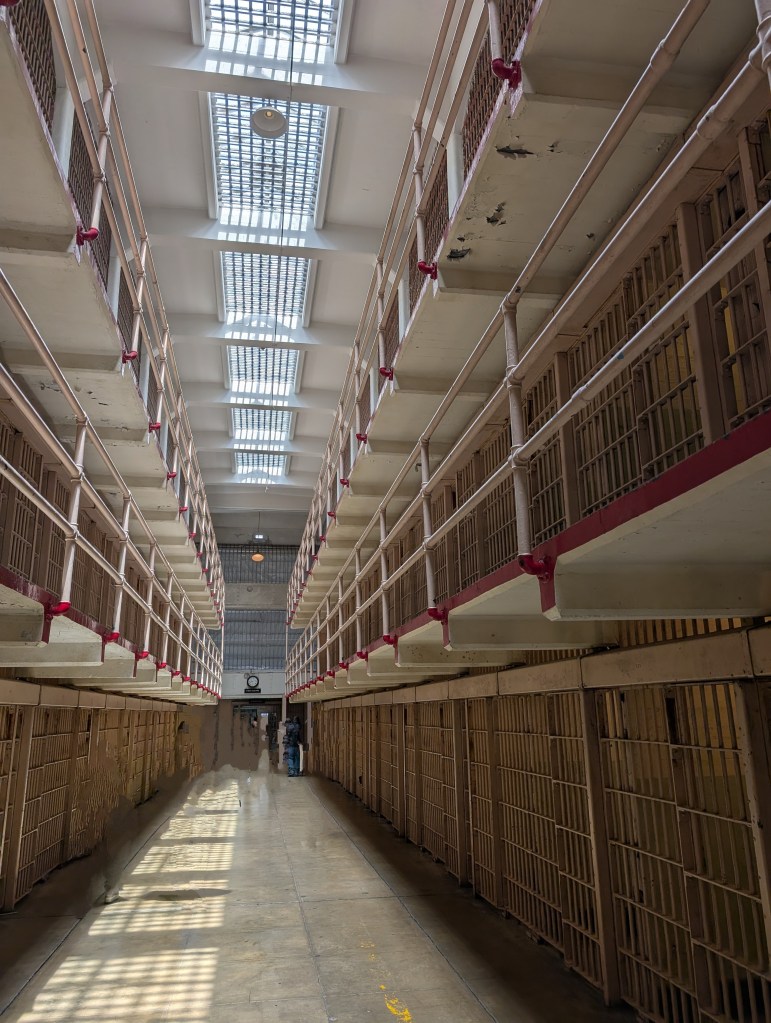
    Oddly enough, I did not take too many photographs in this building. All the cells kind of looked the same, and the interesting part was the story you heard on the recording about each stop. By the way, the shot above was not a miracle, having it free from the crowds. I used Google Magic Eraser. Poof! People gone (except for shadows)

    I spent about four hours total on the island before I ran out of gas and took the ferry back. It was extremely windy, with all kinds of steep paths and stairways to climb, but all worth it. The views are incredible, and if you can stand the smell, there are some huge bird nesting areas to view.

    In some places, the gulls were nesting right along the path, and you could see little, grey spotted chicks around the nests. Cute. 

    After circling the island, and checking out the power plant and other buildings on the end of the island, I meandered slowly back down to the docks. I had enough. I hopped the next ferry back, found a nice comforable chair by the window, and enjoyed some quiet time, doing absolutely nothing. After disembarking (I love that word), I checked out some of the displays they have in the waiting area for the ferry – some large cannons (huge) from the old army installation on the island (Civil War era), and a big model of the island. I used the people-poofer on this photo as well.

    I was initially pretty much convinced that I would just head back to the hotel on the way back, but then thought about the WWII Liberty Ship, the SS Jeremiah O’Brien, at the next pier. I always wanted to see that, so my day was not quite done.

    I’ve always been something of a history buff when it comes to the Civil War and WWII. Not sure why. I had this thing for fortifications since my early childhood, when we visited Revolutionary War forts in upstate New York. I dragged my wife to a few of these piles of bricks later on – she suffered quietly through this obsession of mine. Growing up in NYC, my father used to take us to Manhattan for the annual Navy fleet weeks, so I’ve scrambled around all kinds of warships as a kid. There are not too many of the old ones left, so I try to visit any that are within striking distance, wherever I have lived. Jan and I did a tour of the USS Hornet a few years ago in the Alameda, and I think she enjoyed that one. Maybe because we visited the Hanger One distillery afterwards. At any rate, I’ve always wanted to tour the WWII liberty ship that’s tied up at Pier 37 in San Francisco and since I was a short walk away, I decided this was the time and place.

    Stern view of the O’Brien – that’s a 3 inch gun barrel sticking out

    I was really tired, and even my good knee was aching. So the first thing I see is a steep gang-plank to get on board. Wonderful.

    Ugh. The only way onboard…sorry knees

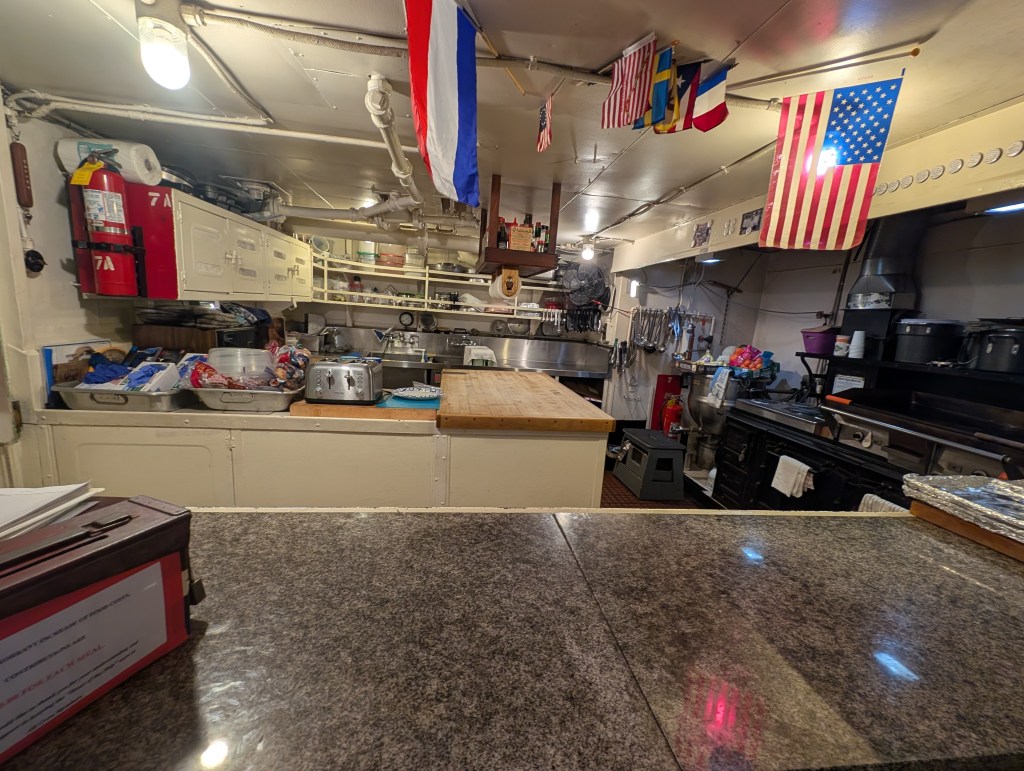
    This is a self-guided tour. You can go just about anywhere on the ship, unless there is signage that says don’t go there. The entire ship is a museum – all the cabins have original gear, and each has a description as who slept there, or what it was used for. You can visit the bridge which is functional, climb up to play with the guns, pretty much go anywhere you want within reason.

    Galley – still functional
    Functional bridge

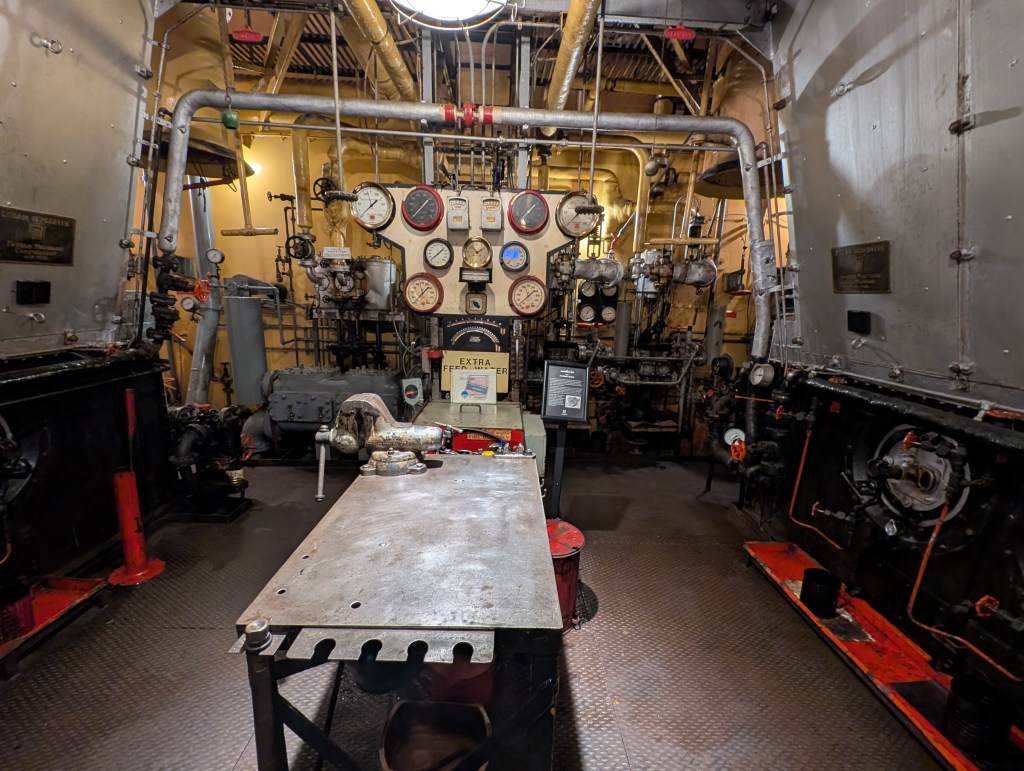
    Funny thing about the bridge. You always see in films, the captain ordering ‘full speed ahead’, and one of the crew members sets the speed on that big contraption with the pointer. I never quite understood what that does. Now I know – actually nothing. There are chains connected to a similar device in the engine room, and it just sets the pointer on that one. The chief engineer sees that, and yells at the crew to turn the dials, valves, light boiler fires and all the other stuff that makes the ship move. Who knew?

    20MM Cannon
    Looking forward from the bridge

    Absolutely the best exhibit of all, is not an exhibit – you can visit a working engine room. At your own risk – a big sign says so at the first ladder going down, and there are lots of signs saying “HOT – Do Not Touch”. This is a functional ship – everything works, and the ship still cruises around the bay under it’s own power. There are a series of REALLY steep ladders that descend to the lowest level where you can see the boilers and pistons that drive the ship’s single propeller. The engineer who maintains and runs the engine room was there, and enjoys answering just about any dumb question you have. I almost understood some of what he was saying about steam condensers, and somehow got into the equation for determining the amount of pressure in each of the 3 different engine cylinders…something which inclues pi. He lost me after a while. It was like talking to a software engineer at Google.

    Looking down – lots of pipes. Steam driven engines are complicated
    The “crankcase” that drives the propellor shaft
    Boilers on either side, and a lot of guages and dials. Not like a Tesla

    Another of my favorite parts of this tour, was the museum they put together in one of the forward holds (this is a freighter). They have a lot of photographs along the walls, giving the history of the ship and liberty ships in general, plus an interesting film on the history of the ship. There are only two remaining, of the thousands built for the war – hundreds of them were sunk by submarines and aircraft bombs. It was a dangerous job working on these ships. The O’Brien served in both the Atlantic and Pacific theaters of WWII, and carried equipment to support the D-Day landings. Quite a story. Worth watching the whole film (getting into the hold was yet another steep ladder).

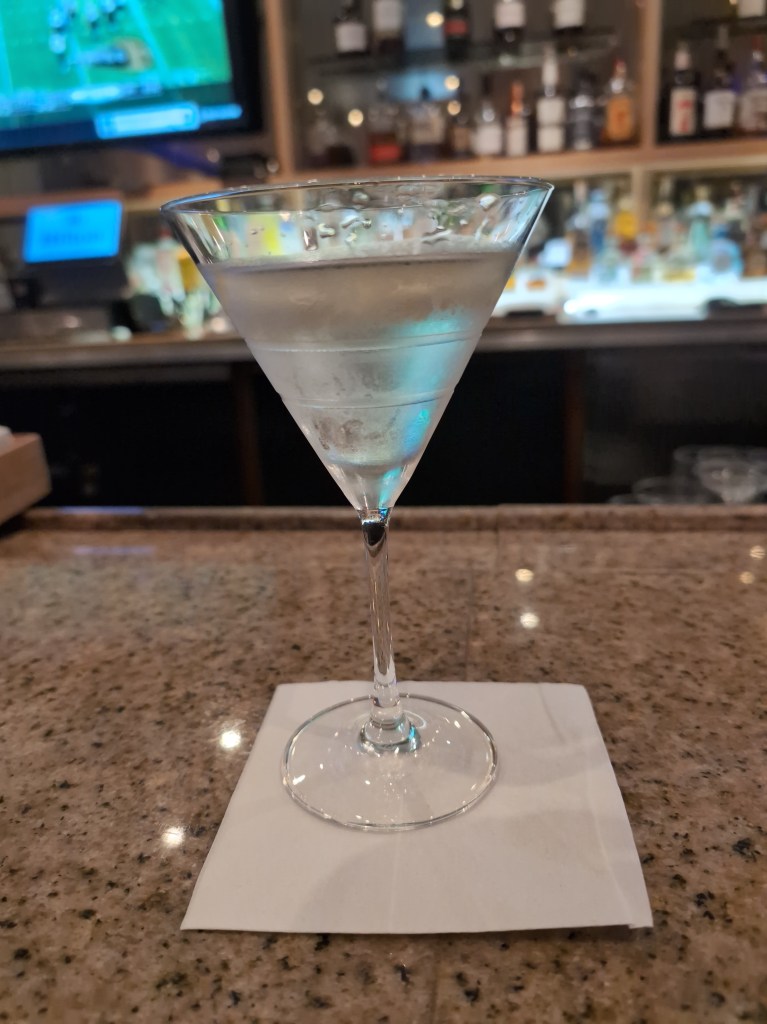
    After a while, my legs were telling me enough climbing up and down ladders. I even opted out of climbing up to play with the big gun (3”) on the bow. It was time to head back to the hotel. I had planned to wander around, maybe hike up to the Coit Tower, but that was no longer an option. It was Uber time. Followed closely by martini time. When I first made the reservations, I had thought about just staying one night, driving home after I was done at Alcatraz. I was so glad I decided to stay the additional night. No way I could have driven home.

    Well deserved, followed by a nice grilled salmon dinner

    So, that was the end of my mini-trip. Check off two entries from my bucket list. A good trip. Except…and here’s the widower part of this blog. It’s really hard going places by yourself when you are so used to being a pair, and then coming home to an empty house. It gets to you after a while. But, I guess you get used to it over time. Or maybe not. Time will tell but I’m not real optimistic of late.

    This may be the last post for a while. I have two full months to kill before my Alaska trip. I’ve got to figure out where to go in-between. I get really bored staying at home. I might go chase whales again, or head up to places I have not been to. Lots of options in California.

    And for those of you who subscribed, I’m sorry if you were surprised to get an e-mail with this post. That’s what you get with subscriptions. You can unsubscribe if you want – check the bottom of the post.

    More information on the liberty ship and Alcatraz can be found on their respective Websites:
    https://ssjeremiahobrien.org/?v=0b3b97fa6688
    https://www.nps.gov/alca/index.htm

  • How to fit 50 lbs of stuff in a 25 lb bag

    Most of what I packed for the Road Scholars trip – no problem with a Subaru Forrester!

    As I alluded to in a previous post, this one will take a crack at explaining how I have been cramming everything you need for photography, kayaking, snorkeling, hiking and general purpose living for a long adventure, and meet the stringent baggage rules for airlines, small cruise ships and even worse, single engine planes. Yeah, some of the trips I’ll be going on are in remote places, and the only way to get there is on small planes. I even get to go on a float plane for one trip. That will be a real treat. 

    You have already seen photos of the camera gear I may bring along on a trip. As I mentioned, there is much more than just the cameras and lenses – there are lots of chargers, cables, extra batteries, memory cards, lens cleaning stuff – just a lot of extraneous but thankfully small objects that need to find a place somewhere in the luggage. I have four options now for packing camera gear in carry-on luggage:

    1. A Think Tank camera roller bag, which can hold pretty much all my stuff, including the GoPro, and it fits in all overhead storage, including commuter jets. I will never check in my camera bag – too much temptation for baggage handlers. The problem with this bag, is that I wind up with two roller bags in the airport until the big bag is checked. Awkward at best. The photo below illustrates how much you can fit in this bag – 2 camera bodies, the big lens and 3 others, the GoPro gear with plenty of room to spare for a laptop, books, a sweater. The weight with the gear below comes in at 17.5lbs.
    Think Tank photo roller bag.
    1. A LowePro backpack, which holds the same amount of gear as the roller bag, but it’s a real backpack with great back and shoulder support. It also fits in overhead storage, but weighs more than the roller bag. I have yet to use it, but likely will for the Antarctica trip. As you can see below, the backpack holds even more gear than the roller bag, and is comfortable to carry with padded shoulder straps and a real waste supporting hip belt. It too weighed in at 17.5 lbs. My only fear is that it might not fit in coach overhead compartments on smaller planes. I usually fly business/first class, so hopefully it will fit.
    LowePro Backpack – Tons of room
    1. A mid-sized back pack from Think Tank – this was the latest pack added to my collection, and can hold a limited amount of gear. If I bring the 500MM lens, I can fit one camera body, and maybe 2 other lenses. It also has limited space for the other stuff you like to bring along on carry-on luggage – meds, iPad, maybe a light sweater, batteries. I almost need to bring a second, small carry-on for that stuff. The proverbial small piece of luggage that fits under the seat in front of you. Where my big feet are supposed to go. As you can see in the photo below, there is a lot less room for gear in this pack – I can fit all the regular camera, gear, but not the GoPro case, and there is little room for extra stuff in the front pockets. But, it only weighs in at 14.5 lbs, and easily fits in any overhead compartment. Plus, I can use this as a pack for hiking.
    1. And last and least – a smaller LowePro camera pack, with even less space for cameras than the other bag. Good for a trip requiring only two smaller lenses, or just the 300MM and one camera body. It’s basically a day pack. 

    For my trips to-date; Option 4 worked fine for Colorado, since I only needed one body, and 2 smaller lenses; Option 1 worked best for the Galápagos Islands, where I carried pretty much everything I owned for this spectacular trip, where snorkeling and underwater photography were on the agenda; I struggled with packing for the Baja trip – I wanted to see if I could pack less, and wound up buying the in-between sized pack (Option 3) at the last minute (I like shopping at camera stores, almost better than REI). The new pack really was not large enough, and I wound up carrying all the extra stuff in the luggage, which was really full. But it worked. My next two trips will be easy – I’ll need the big lens and 2 bodies, so I’ll take Option 1 or 2, either of which should fit in overhead for all the flights. I hope. 

    One of the key factors to check for each option is the overall weight of the packed bags. Some international flights limit your carry-on weight. For the flight from Guayaquil Ecuador to the Galápagos Islands, I believe it was 19 lbs. The roller bag (#1) worked, but the big backpack (#2) did not. My trips next year will also be a problem, since both have really small planes to get to the final destination. I have not quite figured that one out yet.

    My solution for the carry-on weight problem, is to pack all the extraneous get (chargers, monopod, extensions sticks…pretty much everything but cameras and lenses, in the checked baggage. That seems to work.

    So how about the rest of the stuff you may ask? That depends on the trip. Life was easier for packing before my wife passed – we had two large checked bags plus two carry-ons, and were able to distribute most everything we needed including SCUBA gear, my large shoes, all of my wife’s fancy clothing (I dressed a little more casually). There was always enough room. She had more shoes than me, but hers fit inside mine. We were a great match. Now I’m limited to one reasonably large bag for everything but the camera gear. Bummer. But, by figuring out how much clothing I really need, I can leave more of the space for hiking/snorkeling necessities. The magic key is “on-board laundry”! We did this on our one long cruise to the South Pacific – we paid for the laundry package, and had clothes cleaned almost every day. That left plenty of room for other things. I did that as well on the last Geographic cruise. It’s not that expensive, and relieves a lot of packing pressure.

    Fortunately, for the trips I’ve been on so far, I have been able to just bring very light layers, enough for getting there and back, and a few days worth on board before I send stuff off for laundering. Plenty of room for fins, mask, wet suit, and other items needed for excursions. Trips to colder climates (Alaska, Antarctica) will not be a problem either since I will not be snorkeling – I’ll just need more layers, and some of my expedition level hats and gloves. National Geographic provides a parka and fleece layer for the Antarctica trip, and their are outfitters that provide boots for both trips. No need to try and pack heavy footware for those trips. I’m not sure how I’ll get the heavy parka home though – shipping from Santiago Chile?

    Here is all I packed for the Galapagos Islands – that included snorkel gear (fins, mask, etc), a thin wet suit + other neoprene things, water shoes, light deck shoes, a hiking stick and enough clothing for 6 days to cover travel back/forth to US and a few days on board. The small backpack fit in the luggage. And I wore my huge hiking boots on the flight.

    For the Baja trip, most everything was the same except I had fewer camera components – no large lens and extra body since I thought the whales would be close (sniff). I also left the Sea Life camera behind, and just brought the GoPro. Which I never used (sniff). I wound up repacking the camera gear in the new mid-sized back (Option 3) instead of the smaller bag shown in the photo.

    And then there are auto trips. No problem packing on those, especially with a large SUV acting as my traveling closet. For the long Road Scholars trip, I basically emptied out my closet into the back of my car. Well, not exactly, but I did have a lot of stuff in the car. Plus I could carry all of my camera gear without worrying about weight restrictions. Same goes for whale watching, hummingbird chasing, and anyplace else I decide to drive to this summer.

    One of my trips in 2026 will be a major packing challenge – Baja Jones. For this trip, I’ll be sleeping in a hut on the beach along Laguna Ojo de Libre, which is in the middle of nowhere, Mexico (I upgraded to a hut with an en-suite shower…woo hoo). To get to this very remote place on the Baja peninsula, I will first drive to San Diego (a favorite place), stay overnight in a hotel, and the tour will begin the next morning with a limo drive to Ensenada, Mexico. Assuming our countries are not at war by then, there we will board a single engine Cessna for a 2.5 hour flight which hopefully will land safely in Guerrero Negro. There is a single runway airport there – it looks like it is paved.  I’m not sure what the weight restrictions will be, but I doubt if I’ll be able to carry too much. I’ll probably have more weight dedicated to camera gear than clothing – no hiking, no snorkeling or swimming, so bare minimum for clothing, enough for four days in the hut. Everyone will probably smell like salt weather and whale breath after a day anyway, so who cares what you wear. I’ll have fresh clothes waiting in my traveling closet when we return to San Diego.

    The Kodiak Island (or How to Not be Eaten by a HUGE Bear) trip will likely be a bit simpler – this is a photographers trip, so they will expect the 8 passengers to be carrying a lot of heavy camera gear. Plus, I’m guessing we can leave a suitcase at the hotel in Kodiak, so I can just bring what’s needws for the four days on the fishing boat. That will be a very strange trip – sleeping in a converted shipping container, with a shared bathroom for four people, and sleeping in bunk beds. Not a lot of room for luggage, or anything else for that matter. No laundry on this trip. I hope my roomate does not snore. Or is an axe murderer. Something else to worry about.

    So, I’m definitely learning the ins and outs of photography travel – I hope to have it down by the end of this year, and continue to slim down what I take for each trip going forward. Maybe someone will come up with spray-on clothing.