Tag: Road-Scholars

  • How to fit 50 lbs of stuff in a 25 lb bag

    A variety of bags and luggage arranged on a bed, including a blue suitcase, a black travel bag, a green backpack, and a canvas tote.
    Most of what I packed for the Road Scholars trip – no problem with a Subaru Forrester!

    As I alluded to in a previous post, this one will take a crack at explaining how I have been cramming everything you need for photography, kayaking, snorkeling, hiking and general purpose living for a long adventure, and meet the stringent baggage rules for airlines, small cruise ships and even worse, single engine planes. Yeah, some of the trips I’ll be going on are in remote places, and the only way to get there is on small planes. I even get to go on a float plane for one trip. That will be a real treat. 

    You have already seen photos of the camera gear I may bring along on a trip. As I mentioned, there is much more than just the cameras and lenses – there are lots of chargers, cables, extra batteries, memory cards, lens cleaning stuff – just a lot of extraneous but thankfully small objects that need to find a place somewhere in the luggage. I have four options now for packing camera gear in carry-on luggage:

    1. A Think Tank camera roller bag, which can hold pretty much all my stuff, including the GoPro, and it fits in all overhead storage, including commuter jets. I will never check in my camera bag – too much temptation for baggage handlers. The problem with this bag, is that I wind up with two roller bags in the airport until the big bag is checked. Awkward at best. The photo below illustrates how much you can fit in this bag – 2 camera bodies, the big lens and 3 others, the GoPro gear with plenty of room to spare for a laptop, books, a sweater. The weight with the gear below comes in at 17.5lbs.
    An open camera bag showcasing organized compartments, including a camera body, a large lens, and accessories such as a lens cap and personal items.
    Think Tank photo roller bag.
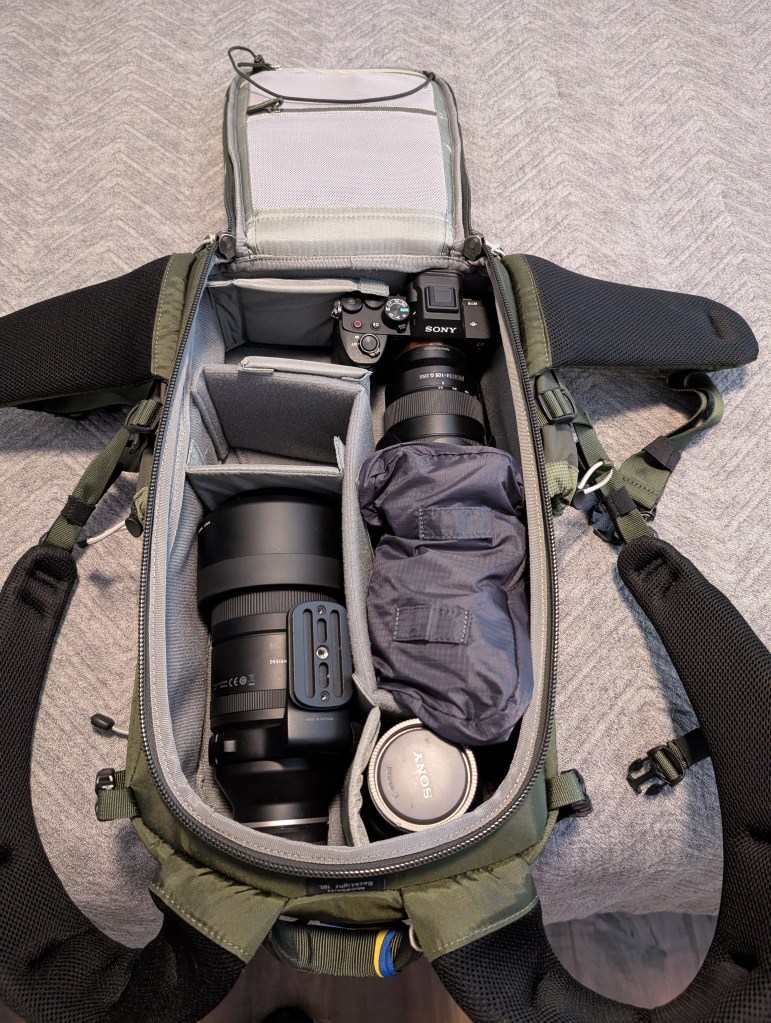
    1. A LowePro backpack, which holds the same amount of gear as the roller bag, but it’s a real backpack with great back and shoulder support. It also fits in overhead storage, but weighs more than the roller bag. I have yet to use it, but likely will for the Antarctica trip. As you can see below, the backpack holds even more gear than the roller bag, and is comfortable to carry with padded shoulder straps and a real waste supporting hip belt. It too weighed in at 17.5 lbs. My only fear is that it might not fit in coach overhead compartments on smaller planes. I usually fly business/first class, so hopefully it will fit.
    An overhead view of an open camera bag, featuring a Sony camera, a large lens, a camera lens cap, and various compartments holding accessories.
    LowePro Backpack – Tons of room
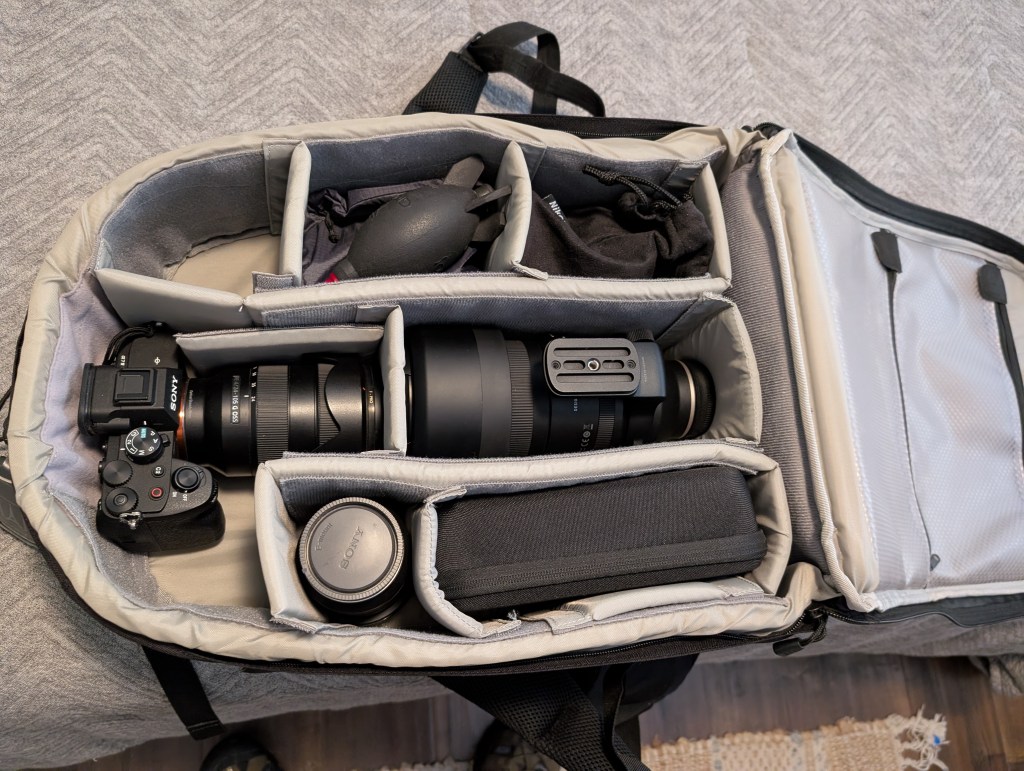
    1. A mid-sized back pack from Think Tank – this was the latest pack added to my collection, and can hold a limited amount of gear. If I bring the 500MM lens, I can fit one camera body, and maybe 2 other lenses. It also has limited space for the other stuff you like to bring along on carry-on luggage – meds, iPad, maybe a light sweater, batteries. I almost need to bring a second, small carry-on for that stuff. The proverbial small piece of luggage that fits under the seat in front of you. Where my big feet are supposed to go. As you can see in the photo below, there is a lot less room for gear in this pack – I can fit all the regular camera, gear, but not the GoPro case, and there is little room for extra stuff in the front pockets. But, it only weighs in at 14.5 lbs, and easily fits in any overhead compartment. Plus, I can use this as a pack for hiking.
    An open camera backpack displaying two cameras, various lenses, and additional accessories organized in compartments.
    1. And last and least – a smaller LowePro camera pack, with even less space for cameras than the other bag. Good for a trip requiring only two smaller lenses, or just the 300MM and one camera body. It’s basically a day pack. 

    For my trips to-date; Option 4 worked fine for Colorado, since I only needed one body, and 2 smaller lenses; Option 1 worked best for the Galápagos Islands, where I carried pretty much everything I owned for this spectacular trip, where snorkeling and underwater photography were on the agenda; I struggled with packing for the Baja trip – I wanted to see if I could pack less, and wound up buying the in-between sized pack (Option 3) at the last minute (I like shopping at camera stores, almost better than REI). The new pack really was not large enough, and I wound up carrying all the extra stuff in the luggage, which was really full. But it worked. My next two trips will be easy – I’ll need the big lens and 2 bodies, so I’ll take Option 1 or 2, either of which should fit in overhead for all the flights. I hope. 

    One of the key factors to check for each option is the overall weight of the packed bags. Some international flights limit your carry-on weight. For the flight from Guayaquil Ecuador to the Galápagos Islands, I believe it was 19 lbs. The roller bag (#1) worked, but the big backpack (#2) did not. My trips next year will also be a problem, since both have really small planes to get to the final destination. I have not quite figured that one out yet.

    My solution for the carry-on weight problem, is to pack all the extraneous get (chargers, monopod, extensions sticks…pretty much everything but cameras and lenses, in the checked baggage. That seems to work.

    So how about the rest of the stuff you may ask? That depends on the trip. Life was easier for packing before my wife passed – we had two large checked bags plus two carry-ons, and were able to distribute most everything we needed including SCUBA gear, my large shoes, all of my wife’s fancy clothing (I dressed a little more casually). There was always enough room. She had more shoes than me, but hers fit inside mine. We were a great match. Now I’m limited to one reasonably large bag for everything but the camera gear. Bummer. But, by figuring out how much clothing I really need, I can leave more of the space for hiking/snorkeling necessities. The magic key is “on-board laundry”! We did this on our one long cruise to the South Pacific – we paid for the laundry package, and had clothes cleaned almost every day. That left plenty of room for other things. I did that as well on the last Geographic cruise. It’s not that expensive, and relieves a lot of packing pressure.

    Fortunately, for the trips I’ve been on so far, I have been able to just bring very light layers, enough for getting there and back, and a few days worth on board before I send stuff off for laundering. Plenty of room for fins, mask, wet suit, and other items needed for excursions. Trips to colder climates (Alaska, Antarctica) will not be a problem either since I will not be snorkeling – I’ll just need more layers, and some of my expedition level hats and gloves. National Geographic provides a parka and fleece layer for the Antarctica trip, and their are outfitters that provide boots for both trips. No need to try and pack heavy footware for those trips. I’m not sure how I’ll get the heavy parka home though – shipping from Santiago Chile?

    Here is all I packed for the Galapagos Islands – that included snorkel gear (fins, mask, etc), a thin wet suit + other neoprene things, water shoes, light deck shoes, a hiking stick and enough clothing for 6 days to cover travel back/forth to US and a few days on board. The small backpack fit in the luggage. And I wore my huge hiking boots on the flight.

    A collection of travel items including a pair of shoes, a black backpack, a small black suitcase, a large blue suitcase, and a travel guidebook titled 'Galápagos Islands' arranged on a bed.

    For the Baja trip, most everything was the same except I had fewer camera components – no large lens and extra body since I thought the whales would be close (sniff). I also left the Sea Life camera behind, and just brought the GoPro. Which I never used (sniff). I wound up repacking the camera gear in the new mid-sized back (Option 3) instead of the smaller bag shown in the photo.

    A blue Samsonite suitcase and a black Lowepro backpack sitting on a woven rug in a room.

    And then there are auto trips. No problem packing on those, especially with a large SUV acting as my traveling closet. For the long Road Scholars trip, I basically emptied out my closet into the back of my car. Well, not exactly, but I did have a lot of stuff in the car. Plus I could carry all of my camera gear without worrying about weight restrictions. Same goes for whale watching, hummingbird chasing, and anyplace else I decide to drive to this summer.

    One of my trips in 2026 will be a major packing challenge – Baja Jones. For this trip, I’ll be sleeping in a hut on the beach along Laguna Ojo de Libre, which is in the middle of nowhere, Mexico (I upgraded to a hut with an en-suite shower…woo hoo). To get to this very remote place on the Baja peninsula, I will first drive to San Diego (a favorite place), stay overnight in a hotel, and the tour will begin the next morning with a limo drive to Ensenada, Mexico. Assuming our countries are not at war by then, there we will board a single engine Cessna for a 2.5 hour flight which hopefully will land safely in Guerrero Negro. There is a single runway airport there – it looks like it is paved.  I’m not sure what the weight restrictions will be, but I doubt if I’ll be able to carry too much. I’ll probably have more weight dedicated to camera gear than clothing – no hiking, no snorkeling or swimming, so bare minimum for clothing, enough for four days in the hut. Everyone will probably smell like salt weather and whale breath after a day anyway, so who cares what you wear. I’ll have fresh clothes waiting in my traveling closet when we return to San Diego.

    The Kodiak Island (or How to Not be Eaten by a HUGE Bear) trip will likely be a bit simpler – this is a photographers trip, so they will expect the 8 passengers to be carrying a lot of heavy camera gear. Plus, I’m guessing we can leave a suitcase at the hotel in Kodiak, so I can just bring what’s needws for the four days on the fishing boat. That will be a very strange trip – sleeping in a converted shipping container, with a shared bathroom for four people, and sleeping in bunk beds. Not a lot of room for luggage, or anything else for that matter. No laundry on this trip. I hope my roomate does not snore. Or is an axe murderer. Something else to worry about.

    So, I’m definitely learning the ins and outs of photography travel – I hope to have it down by the end of this year, and continue to slim down what I take for each trip going forward. Maybe someone will come up with spray-on clothing.

  • Searching for the Horse with No Name – hiking in Utah/Arizona/Nevada

    A solitary tree surrounded by a shallow pond on red rock terrain, with rugged mountains in the background under a cloudy sky.
    The “Butch Cassidy Pond” in Snow Canyon State Park

    I’ll get to the not so exciting photo above in a bit – of course there is a story line for that. This post has a lot of territory to cover, and I did split it in half, since this really was two (actually three) separate trips over about 3 weeks of travel.

    I had heard from other passengers on the first two National Geographic trips, that I should look into Road Scholars tours – they cover pretty much the world, and have a more educational focus than many of the other tour companies and organizations. Oddly enough, after I returned from the Galapagos trip, I received their catalog (as did my sister-in-law), and I found a domestic, hiking focused trip which covered two of the national parks in Utah that I was planning to visit this year. Better yet, the tour kicked off in St. George Utah, so I could drive there instead of yet another plane ride. And even better than that, I could piggy-back my own trip to try and get to “The Wave”, out of Kanab (more on that in a separate post) AND stop and see family in SoCal on the way home (and also visit the cemetery..I won’t discuss that). Three trips in one! So I booked it – I was on the wait list initially, but someone cancelled a week or two later. The trip was scheduled for early May, so it fit in well with my schedule. Perfect.

    I had a lot of time to prepare for this trip, but stressed out about the drive and my add-on side trips. Seemed like a lot of driving. But as always, I did a lot of research on hotels, drive distances, and options for what to do in Kanab, and went ahead and booked everything up to heading home. That was about two weeks worth of scheduling. I figured I could make reservations for the return drive later in the trip. I also stressed out (I do that a lot) on what to pack before realizing that I was driving my Subaru Forester – I could just make that my driving closet, and bring whatever I thought I might need. Plus, I found what appeared to be a nice laundromat in Kanab. All potential problems solved.

    The trip to St. George was not too bad. I split the trip into two overnights so I did not have to drive too far each day, stopping in Bakersfield CA, then on to Las Vegas, which would get me into St. George for check-in way ahead of schedule. I like having extra time – no pressure. I’ve done the trip to Las Vegas (and St. George) many times with my wife – that was the southern route to/from Sacramento and Denver, and we once did a trip from Denver to LA to visit family through those cities. This time around, I stayed at the same hotel in Las Vegas, away from the strip – never been into the casinos. I did slip one side-trip into the schedule – Fire Valley State Park, on the way to St. George. This is one of Nevada’s premier state parks. It’s sort of like Red Rocks (CO) or Roxborough (also CO) parks on steroids. You can just drive around the loop roads to see the sights, or stop and hike on some really nice trails. Incredible red rock formations and scenery, plus the geology is interesting as well

    Rock formations in a desert landscape with red and orange hues under a cloudy sky.
    Fire Valley = Beehives
    A towering red rock formation balancing on top of a larger, flat boulder, set against a clear blue sky.
    Fire Valley – Balanced Rock
    Close-up of a rugged rock formation with unique arches and reddish hues amidst a desert landscape.
    Fire Valley – Elephant Arch (meh)
    A landscape featuring rocky formations and a cloudy sky, with reddish-brown rocks and sparse vegetation in the foreground.

    The weather was pretty crappy – drizzling, windy and cool, so the photography was not great, but it was a good start to the trip, and I planned to hit this on my the return trip. The park closes all the trails on May 15th for the duration of the summer. It gets way too hot for hiking. You can still drive through it though.

    I pulled into St. George in the afternoon, and checked in with Road Scholars team. The tour lead was an extremely interesting local (from St. George) – very personable, and he turned out to be a perfect fit for this trip. He was a Swiss Army knife of a tour guide – he knew just about everything about this particular part of Utah – a fountain of information on geology, hiking, flora/fauna and history, and was an excellent organizer as well. That evening, we had a group dinner, and then had a Geology 101 lesson from a local expert from Utah State (I think). That was fun for me…sort of a refresher. We also got a really cool book on the geology of the parks in Utah. Bonus round!

    The group was very small – 13 of us total. There were two couples, 8 women, and me. Most everyone was from the East coast. I was the only person who drove. Good group – very friendly, and I did not feel weird being the only single guy. Same thing happened on my last National Geographic trip – the only single out of 85 others. Talk about standing out in a crowd.

    Since the Road Scholars trip covered three separate parks, I’ll break the rest of this post up into sub sections.

    Snow Canyon State Park

    This park is located just west of St. George, and is a popular hiking spot for residents in the area. It has sweeping vistas of the huge wall of Navajo sandstone which borders the west side of St. George, and has a lot of interesting hikes which wander through the sandstone and lava formations. There are even a few lava tubes – long caves, which run through portions of the park. A lot of different things for hikers and geologists. The park also has some movie history as well. A number of scenes from Butch Cassidy and the Sundance Kid were filmed in the park. Some visitors try to find all the locations from the film for selfies of course. The pond photo at the head of this post, is a well photographed scene from the movie, where Robert Redford was kneeling for some reason. I think Paul Newman was filmed floating in the water as well. Whatever.

    For our hike, there was plenty of water ponding on the sandstone, since it rained (poured) for the duration of this hike. Made for some tricky footing….more like mud in some places. The sandstone was rough enough to provide stable footing, but the sections with lava rock were tricky. There were also a few steep sections as we wandered around for 5 miles in the rain. I’d love to go back there when the sun was shining. It’s really a gem of a park. St. George is also a nice city.

    Desert landscape featuring layered red rock formations under a cloudy sky.
    A rocky landscape featuring red rock formations under an overcast sky, with sparse vegetation in the foreground.
    Scenic view of red rock formations and rugged mountains under a cloudy sky, with sparse vegetation in the foreground.
    A barren landscape featuring layered rock formations and sparse vegetation under a cloudy sky.
    Great bedding in the sandstone formation (if you are a geology nerd)
    A rocky landscape with layered hills under a cloudy sky, featuring a dirt path leading into the scenery.
    Nasty rain clouds

    There was so much rain that day that there were waterfalls cascading down the cliffs, something you don’t see to often in that part of Utah. The bad news is my new REI raincoat was not really cut out for heavy rain. I was really wet and chilled when we finally got back to the bus. Fortunately everything dried out quickly – even my boots (after using the hairdryer on them). I’m glad we were staying in hotels instead of camping.

    One thing I did learn about this tour from the first day  – this was a hiking trip, while I was interested in a hiking AND photography trip. I had a brand new Sony A7IV, which I purchased a few days before the trip. Another tariff avoidance purchase. I really wanted to test it out on landscape photography, and had brought only two lenses along, a 17-28 wide angle, and a 28-105 telephoto. I was not planing on wildlife photography unless the subject was really close. So, as it turns out, I was the only person on this trip that had a camera that was not also a phone (I had my Pixel phone too). This was not like the National Geographic trip, where photography took precedence over most everything else. The problem for me was that everyone just charged ahead, listening to the trip lead who had a microphone/radio setup so everyone could hear him as we wandered along. It was easy enough for everyone else to just pull there phones out to snap a photo. I learned quickly how to solve the problem – I just stayed back to get the shots I needed, and caught up to the group. The trip lead was super flexible, and wanted to make sure everyone was getting what they wanted out of the trip. I was never left behind, nor did I slow down the group. A good thing of course.

    Zion National Park

    Zion has been on my punch list for a very long time, and it did not disappoint. The trip to the park from St. George was interesting, especially with our tour guide supreme who pointed out all the geologic features we were passing, as well as interesting historical facts about some of the towns, like Hurricane. Once we pulled into the park, we immediately set out on a warm-up hike – only 700 feet elevation gain (seemed like more) with a few switch backs, to a great overlook point. Here’s where I decided to start hanging back to take photo’s (the bus driver/lead kept looking back to make sure I was following). Incredible views of the towering rock walls and peaks from that point.

    A scenic view of a mountain with steep red cliffs, a lone green tree, and a foreground of fallen tree branches and shrubs in a desert landscape under a clear blue sky.
    A scenic view of Zion National Park, showcasing tall, rocky mountains and lush greenery under a partly cloudy sky.
    A scenic view of a towering rock formation in Zion National Park, with a green tree in the foreground and a blue sky filled with clouds.
    I’m really pleased with the sharpness of these shots with the new camera

    We bussed from there to the Zion Park lodge, another absolutely beautiful spot with views of the cliffs, lots of nice places to sit, and a large open area with a gigantic cottonwood tree in the center. All they need there is a Starbucks or Dairy Queen. Lunches were all boxed for us, with large sandwiches, sides, fruit and some sort of cookie. This day, we each had a container with about 2 pounds of potato salad, enough for a family. After lunch, we headed off to our next hike – a relatively “easy” hike that most every tourist goes on, to the Emerald Pools. 

    A large tree with a broad canopy stands in a grassy area, set against a backdrop of red rock cliffs and overcast skies.
    Huge cottonwood, in front of the Lodge.

    The trail to the pools is a series of ups and downs with a lot of steep rock steps and narrow passages – perfect for handling large crowds (not really). There were choke points all along the trail and unfortunately, the rock steps were the final straw for my knee, which finally said it had enough for the day. Fortunately, all we had left at that point was one steep set of rock steps, followed by a real, paved path which led back down to the river. We all opted to get our feet/shoes wet, since we could simply cross the narrow (cold) Virgin River, and be right back at the lodge. The alternative was to go back the way we came….through all the crowds. Nobody fell in the stream, and it was nice just hanging around, waiting for the bus to take us to our hotel for the night. I really could have used a grande frappacino. Darn. That evening is when I really started to appreciate hotels that had hot tubs. Fortunatly, ever place we stayed had one. Ahhhh.

    A sparkling waterfall cascading down a rocky cliff in a lush green landscape.
    A nice cool spot behind the waterfalls, on the path down

    That evening, after dinner, we had another of the Road Scholars educational experiences – the head of a birds of prey rescue organization gave a lecture, and brought a few of his feathered friends along. The lecture was great, and seeing the magnificent birds (Screech Owl, 2 falcons, a hawk, and a Golden Eagle) was amazing. We have Screech Owls in the woods behind my house – we hear their warbled calls (not a screech) but have never seen one. I surprised how tiny they are…cute little things. 

    A person wearing a black glove holds a small, gray owl with large eyes against a light background.
    Screech Owl

    A falcon perched on a glove, showcasing its spotted feathers and alert demeanor against a light background.
    Prarie Falcon

    The next day, our trip lead gave us choices for the morning hike. The more difficult one climbed up to an overlook called the Boy Scout Lookout, which required hiking up two long stretches of steep switchbacks (including Walter’s Wiggles). This is the trail that leads to the start of Angels Landing trail, which requires a permit and probably a waiver, since it is very steep and exposed. Sort of like the Yosemite Half Dome cable route, but with a chain to hang on to. The optional hike, was to follow the Virgin River for 7 miles, getting some great views of the valley and rock walls, until you reach the narrow end of the valley. My brain wanted to do the hard hike, but my knee won out and I opted for the less strenuous hike. That worked out – we had the morning light, and I was able to shoot a lot of photos, at my own pace. There was no real trail – we bushwacked a lot, and followed what was probably a deer trail at times.

    A panoramic view of towering red rock formations under a clear blue sky in Zion National Park, showcasing steep cliffs and lush vegetation at the base.
    A scenic view of towering red rock formations in Zion National Park, with a clear blue sky and a winding stream in the foreground.
    Majestic red rock formations under a clear blue sky in Zion National Park.
    Angel’s Landing is at the top of this peak. Not for me anymore.

    The final hike at Zion was to wade into the Virgin River in the narrows – this is a significant tourist trap, where the outfitters in Springdale rent out entire outfits (boots, waders, staffs) so you can avoid getting wet. The place at the end of the paved trail where you enter the river looked like a wading pool at a water park – way too crowded. I passed on the opportunity, but walked the trail anyway, just to see what it looked like. There were people pushing baby carriages, and even a few folks on walkers. Not a difficult hike.

    I managed to walk/hike about 7 miles that day. More than enough. Most of it was relatively flat – my knees were grateful.

    Bryce Canyon National Park

    The next morning we loaded up our luxury bus once more, and headed off to Bryce Canyon. That was a beautiful drive, and included going through the Mount Carmel Tunnel….not to be missed. Once we reached the park, we first stopped at one of the park overlooks – OMG. I have seen photos of Bryce before, but these could not come close to seeing the expanse of this amazing place in person. What makes Bryce so special, is erosion. Over time, the sandstone erodes along fracture lines into thin “fins”, with slot canyons separating the fins. Freeze/thaw cycles create windows within the fin walls, which continue to erode, creating very strange narrow towers, called ‘hoodoos’. These take on strange shapes as the softer rocks erode faster than the hard capstone sandstone at the top layer. And there are different colors too, as the sandstone continues to leach out. The park is basically a huge basin with slot canyons and all kinds of strange hoodoos. There are trails along the rim, with viewpoints that can be reached by auto, and trails which head down to the canyon floor and meander through the fins and hoodoos. The place is magical…I’ve never seen anything quite like it. 

    A panoramic view of Bryce Canyon showcasing its unique rock formations, hoodoos, and colorful cliffs under a partly cloudy sky.
    View from an overlook
    A panoramic view of rugged red rock formations and deep canyons in a desert landscape, characterized by towering spires and unique geological features.
    Lookng down between “fins”.
    A scenic view of rock formations and deep canyons at Bryce Canyon National Park, displaying orange and white hoodoos with a natural arch in the foreground and pine trees.
    Looking thru a window
    Close-up view of textured rock formations with two natural openings, revealing trees inside the rocky landscape.
    More windows in a thin fin – isn’t erosion wonderful?
    A close-up view of the unique rock formations at Bryce Canyon, showcasing layered orange and red cliffs with a prominent spire in the center.
    This place is just so wild, weird and beautiful!

    The first hike that day pretty much stayed on the rim – I forget how many miles it was, since I was focused on taking photographs and just enjoying the incredible view. I think I was giggling as I was walking along. After lunch, we did another hike – I opted out on the longer hike, and went off with one other person to view one of the named hoodoos, Thor’s Hammer. We dropped down into the canyon part way to see it.

    A tall rock formation, known as a hoodoo, with a small, flat top, surrounded by other rocky structures and trees in a canyon landscape.
    Thor’s Hammer!

    The next day was our last hike before heading back to St. George. I went with a small group to follow the Wallstreet trail down to the canyon floor, and then back up after viewing a few more of the named hoodoos. The trail down was fun, heading into a slot canyon between the rock fins. It was a pleasant walk through the canyon, and a long climb back out. Well worth it. 

    Narrow canyon with towering red rock walls under a clear blue sky, featuring several hikers exploring the terrain.
    Walking in the canyon slots
    View of tall rock formations with a clear blue sky above and trees growing in a canyon.
    Long way up to catch the sun
    A tall, rugged rock formation with a vibrant orange hue under a clear blue sky.
    A close-up view of unique rock formations resembling hoodoos against a clear blue sky in Bryce Canyon National Park.
    So many strange shapes
    A man hiking through a narrow rock arch in a desert landscape, holding trekking poles and wearing outdoor gear.
    Lots of little holes …. a good place to be short
    Two unique rock formations resembling humanoid figures against a clear blue sky.
    The Silverback Gorilla (by special request)

    Bryce was, to me at least, the highlight of this trip and someplace I want to return to. 

    We motored on back to St. George that afternoon, staying at the same hotel we started out in (good thing since my car was there). We had a nice farewell dinner, and said our goodbyes that night. I really enjoyed this trip – it was nice having a smaller group for a change. It’s hard to get to meet everyone on a cruise with 80-100 passengers on the National Geographic tours. It was also nice to have a place to share photo’s, but as with all the trips, interest fades once the trip is over.

    But, at least I had more to look forward to. On to Kanab. And the next Post